
Epoxy Floor Installation: What to Expect
A professional epoxy floor installation follows a deliberate, step-by-step sequence. Each stage has to be completed properly before the next can begin — which is why understanding the full process helps you know what to expect, what questions to ask, and why the work unfolds the way it does.

The Short Answer
A complete epoxy floor installation works in sequence: the contractor examines the slab, prepares the surface, addresses any cracks or defects, applies the coating in layers, and allows each stage of curing to reach the appropriate state before the next phase of use begins. The flooring contractor assesses your specific slab before recommending a system and walks you through the expected schedule before any work begins.
What Happens During Professional Epoxy Floor Installation?
A reliable installation follows a consistent sequence. Each step depends on the one before it — which is why an experienced contractor moves through them in order rather than looking for shortcuts.
01
Evaluate the Concrete
The work begins with an assessment of the slab itself: its condition, surface porosity, moisture levels, and anything already on it — prior coatings, sealers, or contaminants that could interfere with adhesion. That evaluation shapes every decision that follows, from which system is appropriate to how extensive the prep needs to be.
02
Prepare the Surface
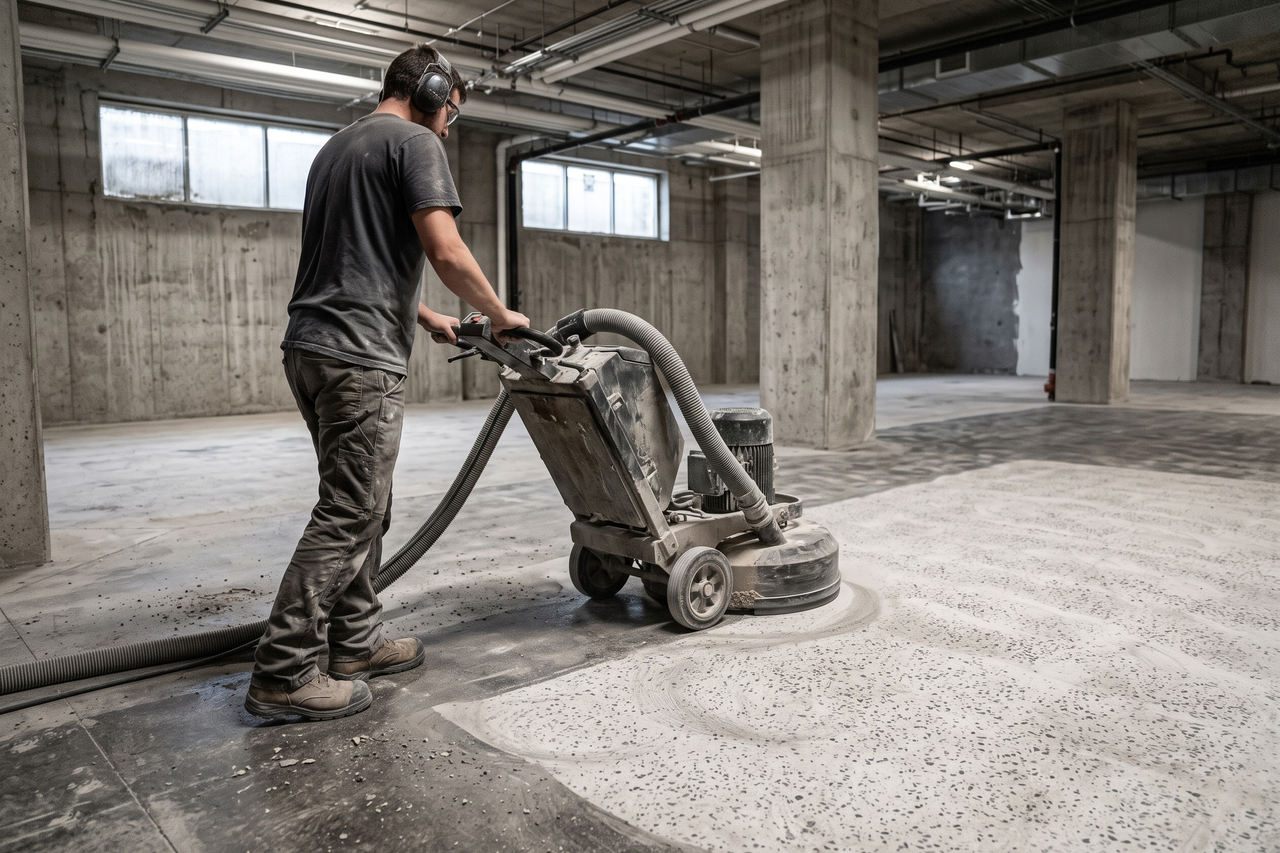
Preparing the surface means running mechanical equipment — typically a floor grinder or shot blaster — across the concrete to expose clean material and create a texture the coating can grip. Which equipment is used and how aggressively depends on the floor’s current condition and the system going on top. A coating placed on concrete that hasn’t been profiled this way lacks the bond it needs to hold up under real use.
03
Repair Cracks and Defects
Cracks, spalls, and pitting in the concrete are addressed before any coating material is mixed or applied. What the repair looks like depends on the nature of the damage — a fine surface crack is treated differently from one that’s wide, active, or structurally driven — and the contractor determines which approach fits each situation after examining the floor directly.
04
Apply the Coating System
The system goes on in layers: a penetrating primer coat first, then the base coat (with decorative broadcast flake applied into the wet coat if that’s part of the system), and one or more topcoats to seal and protect the surface. Each layer reaches the appropriate state before the next is applied.
05
Allow the Floor to Cure
The floor doesn’t finish curing all at once — it progresses through defined stages. Foot traffic becomes acceptable first, once the surface has firmed sufficiently for light use. Vehicles and heavy rolling equipment require the floor to reach a higher state of cure before contact. Chemical resistance — the capacity to handle cleaning agents, solvents, and spills without risk — is the final milestone. The installer explains the full curing sequence before any work begins.
What Makes a Professional Installation Different?
What separates a professional installation from a do-it-yourself attempt isn’t only technique — it’s the assessment that happens before a single product is opened. The contractor evaluates the slab, identifies any conditions that could undermine the coating, and determines what the concrete actually needs before recommending a system.
Moisture trapped below the surface, contamination that isn’t visible to the eye, and a surface that hasn’t been profiled correctly can all compromise a coating regardless of how carefully it’s applied. Identifying those variables in advance is what gives the finished floor its best chance of performing the way it should.
When we connect you with a flooring contractor, you get someone who reads the concrete first and explains the plan — what the floor needs, why those steps are necessary, and what you can reasonably expect from the result.
Why Concrete Preparation Matters
For a deeper look at what proper surface prep involves — including how grinding works, why moisture testing matters, and what crack repair accomplishes — our concrete preparation for epoxy flooring guide covers each step in detail.
Preparation has a big influence on how well the coating bonds. A slab that hasn’t been ground to the right profile gives the epoxy inadequate mechanical contact, which is often part of the problem when a floor fails early — alongside moisture conditions and the coating system selected.
Grinding opens the surface pores and removes anything that would block adhesion: old sealers, surface laitance, and residue from prior coatings. On floors that appear clean or smooth, this step is especially easy to underestimate — and skipping it is a documented source of early delamination under real-world use.
How much grinding the slab needs, and which method is appropriate, depends on where the concrete is starting and what coating system will go on top of it. An experienced installer reads the floor before any equipment is selected or put to work.
Repairing Cracks and Surface Damage
Cracks, spalls, and surface pitting are addressed during the preparation stage, before any coating material goes down. Leaving those defects in place introduces weak points into the finished floor — places where moisture can travel, edges can lift, or cracks can re-open beneath the coating over time.
The repair method depends on the nature of the damage. Minor surface cracks in the right conditions may be bridged with the primer coat. Larger cracks, cracks that show signs of movement, or cracks with structural causes call for a filler or repair compound chosen to match the situation. The contractor evaluates each crack and explains the approach.
Coating over unaddressed damage doesn’t make it disappear — it usually delays when the problem becomes visible, and remediation after the fact is more involved than addressing the issue before the coating went on.
Applying the Epoxy Coating System
If you’re weighing epoxy against polyaspartic and want to understand how the two systems differ in curing, UV stability, and performance characteristics, our epoxy vs. polyaspartic guide lays out the key distinctions.
Once the surface is prepared and repairs are complete, the coating system is applied in a manufacturer-specified sequence. A primer coat goes down first, formulated to penetrate the prepared concrete and create a stable base for the coats above it. If decorative broadcast flake is included, it’s introduced into the wet base coat before the topcoat seals it in.
Topcoats provide the abrasion resistance, chemical resistance, and surface finish that the floor will carry through daily use. The number of topcoats, the type of product, and the film build all depend on the system selected and what the space demands — a warehouse floor serving pallet equipment has different requirements than a residential garage used for household vehicles.
Ambient conditions — temperature and humidity in particular — affect how each layer cures. A professional installer monitors those variables throughout the application and adjusts the process accordingly.
How Long Does Epoxy Flooring Take to Cure?
For a sense of what professional installation costs at different floor sizes and how those numbers are structured, our epoxy floor coating cost guide walks through pricing factors and planning estimates.
Curing proceeds through distinct stages, and understanding the sequence helps you plan around the project. The surface firms up enough for foot traffic first — at that point it can handle light use without damage, but it isn’t ready for vehicles or heavy loads. Those loads require additional curing time before the coating has the strength to handle rolling weight and turning forces without risk.
Full chemical resistance is the final stage: the point at which the coating has cross-linked fully and can handle spills, solvents, and cleaning agents the way it’s designed to. Reaching that stage takes longer than foot-traffic readiness or even vehicle readiness.
When each stage of curing becomes ready depends on which coating product is in use, how many coats make up the system, and what temperature and humidity conditions were present during and after application. The contractor maps out the full expected sequence before the project starts, so you have a clear picture of what the floor can handle at each point and can plan around it accordingly.
Frequently Asked Questions
Does the contractor need to look at the concrete before recommending a coating system?
Yes — the evaluation comes before any recommendation. The contractor examines the slab’s condition, surface porosity, and moisture levels, and reviews anything already on the surface before suggesting a system. Working backward from a product recommendation to the floor would skip the assessment that determines whether that product is appropriate.
What happens if the surface isn't properly prepared before coating?
Preparation creates the mechanical bond between the coating and the concrete. A surface that hasn’t been profiled correctly gives the coating less to grip, which increases the likelihood of delamination under traffic, temperature cycling, or moisture pressure. Professional installation treats preparation as integral to the result, not a step that can be abbreviated.
Can epoxy be applied over an existing coating or paint?
Sometimes, yes — but the existing material, how firmly it’s attached to the concrete, and what the contractor discovers during the assessment all factor into that answer. If the current coating shows signs of lifting, bubbling, or failure, it typically needs to come off before any new system can be applied reliably. The contractor examines the surface and advises on what it can actually support.
How will I know when it's safe to use the floor again after installation?
The contractor explains the curing sequence before work begins — when foot traffic is permitted, when vehicles can return, and when the floor has reached full chemical resistance. That schedule depends on the products used, the number of coats applied, and the conditions during curing.
What if new cracks appear in the floor after the epoxy is installed?
Post-installation cracks generally point to movement or shifting in the concrete itself — a slab issue, not a coating failure. The installer can look at the crack and advise whether it needs to be addressed and what the options are. That situation is different in character from pre-existing damage that wasn’t repaired before the coating was applied.
Does temperature or humidity affect installation or curing?
Yes. Most epoxy and polyaspartic systems have defined temperature and humidity requirements for both application and curing. The contractor monitors those conditions and plans the work around them. Applying a coating outside the recommended parameters creates the conditions for adhesion problems or improper curing.
Ready to Upgrade Your Concrete Floor?
We’ll work to connect you with an independent flooring contractor serving Madisonville, KY and surrounding areas — share what your floor needs, and we can match you with a contractor who can evaluate the project and, if it’s a fit, prepare a customized quote.